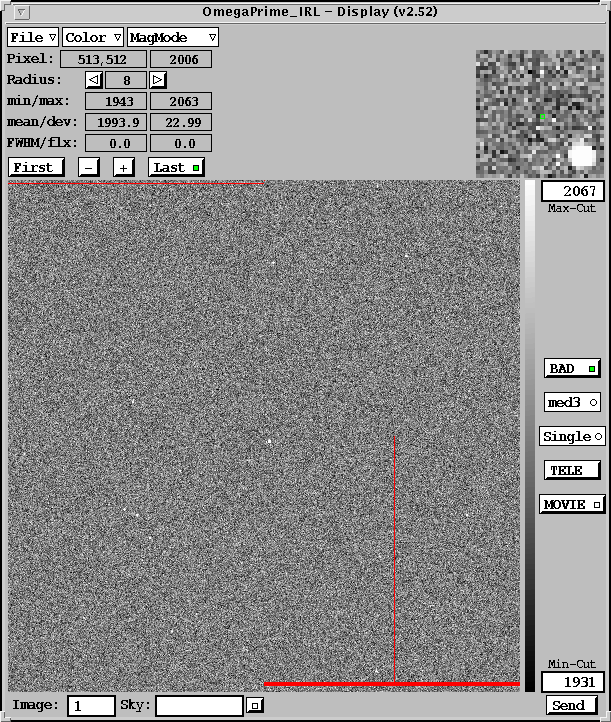
The image display portion of the GUI should also automatically start
when the GUI is initialized.
File Menu: selects the basic display size.
256 Changes display window to 256 screen pixels square. The
full Omega-Prime image is displayed, binned 4x4.
512 Changes display window to 512 screen pixels square. The
full Omega-Prime image is displayed, binned 2x2.
1024 Changes display window to 1024 screen pixels square. The
images are displayed at full resolution.
Slave ?
Quit Quits the display module. It can be restarted by
selecting "display" under the module menu of the camera control
window.
Color Menu: selects the color look-up table for displaying images.
Gray is a black-and-white color table.
Temp is the standard "temperature" color table.
BB is the standard blackbody color table.
MagMode Menu: switches between the zoom window and a measurement of the image seeing.
Magnifier Zoom window, this is the default mode.
FWHM-log Measures the FWHM of the indicated object each time
a new image is displayed, and plots a running history of the
values. This is useful when focussing Omega-Prime. Note that to
get reasonably accurate measurements of the FWHM, the aperture of
the box used (set with radius, see below) must be large enough to
include a couple of rows of sky pixels around the object you are
measuring!
Pixel: When the cursor is on the image display window, the pixel
position and counts in that pixel are displayed here.
Radius: Sets the radius of the small cursor box on the image
display. See the above note on FWHM-log about measuring the seeing.
min/max: Show the minimum and maximum values of the pixels within
the cursor box.
mean/dev: Shows the mean and standard deviation of the pixels within
the cursor box.
FWHM/flx: Shows the FWHM and total flux (in counts) of an object
selected with the cursor box.
First - + Last Controls the display of a series of images. Unless you need to review a set of images to determine, for example, whether the
seeing was good enough to bother saving the data, just leave this on last.
BAD Toggles between displaying the bad pixels (in red) or not. Note
that the bad pixels are ignored when determining display cuts
only if the bad pixels are turned on.
Cuts Display stretch control. This button brings up a menu with
various options for determining the minimum and maximum display levels.
The options include:
Cuts Allows you to enter your own minimum and maximum display
levels in the "Min-Cut" and "Max-Cut" windows.
67%
90%
med3
med5
3/10 Sets the display from (mean - 3sigma) to (mean +
10sigma).
minmax Sets the display range to cover the full dynamic range
of the data.
Min-Cut & Max-Cut: These windows show the current minimum and maximum
levels used for the display. They will automatically update each
time a new image is displayed except if using the "Cuts"
option.
Single/Sum/Ave: Single will display each individual read as it comes off
the camera. Sum will display the sum of all images taken in the
current series. Average displays the average of all images taken
in the current series.
Tele Provides for offsetting the telescope directly from the image
display, which is useful for centering standard stars or science
objects. Click on the "tele" button to get a green circle. Place
this circle on some object on the display and click again. Move
the cross which appears to where you want this object to be moved.
Movie Plays a movie of the series of exposures currently in memory.
Sky The "sky" button (small square) tells the computer to subtract a
sky frame from the images before displaying, and is on when the
square appears green. The file used for the sky frame is specified
by name in the window to the left of the button.
Image shows which image in a series of repeated exposures that is
currently being displayed.