Index
Purpose
This is a quick guide for observing with PMAS in its different modes
(LArr, PPAK...). It is not, in any sense, a complete User Guide. If
you want to check the characteristics of the instrument, please
consult the Official PMAS
webpage.
PMAS has two main modes, the Lens Array or LArr,
and PPAK.
- LArr comprises a fiber-bundle coupled with a lens-array of
256 elements, in an square regular grid of 16x16 lenses. The spatial
resolution of the lens-array can be changed on demand with three
different options: 1.0"/lens, 0.75"/lens and 0.5"/lens, covering FOVs
of 16"X16", 12"x12" or 8"X8" respectively. However this change cannot be performed (by now)
during the night , but prepared before the observations. You
should inform CAHA staff ASAP of your selected setup
(coords@caha.es).
- PPAK comprises a pure fiber-bundle of 331 science fibers
with a diameter of 2.7"/fiber projected in the sky, covering an
hexagonal are of 72"/diameter. In between the science fibers there are
15 calibration fibers and 36 sky fibers (located at about ~80" from
the center). The calibration fibers are conected to the calibration
unit (PPAK-CU), and can be illuminated with the same lamps than the
LArr calibration unit. The main difference with
the LArr mode is that you cannot illuminate the science fibers with
that lamps. Therefore, for wavelength calibration and spectra
tracing you require to illuminate them with DOME Lamps. With this
purpose, a maximun of 3 arc lamps can be installed to illuminate the DOME
(see list of possible DOME Lamps, for
selecting the most appropiated for your program)
Gratings, resolutions and spectral ranges:
PMAS is a medium/low resolution spectrograph that can cover
wavelength ranges between 3500-12000 Å, limitated by the atmospheric
cut-off (in the UV) and the sensitivity of the CCDs (still not well known in
the NIR). PMAS can reach three different resolutions, by using the
same number of gratings: 300 rules/mm, 600 rules/mm and 1200
rules/mm. The especific covered spectral range is defined by the
Grating Rotator angle (GROT) and limited by the actual size of
the CCD. If you want to check the possible wavelength ranges and
dispersions, please consult the PMAS
official grating webpage. The quoted
spectral dispersions in the official webpage (Å-per-pixel)
refers to the Binning 1 in the X-axis. Only the 1st order forward (fwd) is offered for any PMAS grating, appart to the I1200, which operates in the 2nd order (bwd).
.
Required Calibrations in IFUs
Fiber based Integral Field Units (IFUs) data require especific
calibrations that may not be well known by people not used to this
technique. We summarize here the different kind of calibrations you
may require, and its use:
- BIAS, just the same bias you are used to! In PMAS (any
mode) the BIAS is not just a single value. It has structure. We
recomend to take a series of BIAS frames at the end of the night, by
selecting the Finish Night option in the ObsNight menu
of the PICS GUI, and following the instructions.
NOTE: The BIAS structure depends on the binning. It is required to
take a different BIAS for each selected binning.
- DARKS, just the same DARKs you are use to! PMAS does not
have significant dark current.
- FLATs Flat-field exposures do not have the same
use than in normal CCDs imaging and/or slit-spectroscopy.
In PMAS it is not possible to illuminate the spectrograph CCD without
passing through the fibers and the spectrograph, and therefore you can
hardly derive the pixel-to-pixel sentitivity variation, and/or the
fringing pattern. In general terms the coadding inherent to the
spectra extraction in this instrument blurs the effect of these
variations.
DomeFlats and/or SkyFlats are required to derive
the fiber-to-fiber transmission variation, that can be up-to a 20% of
the average (appart from a single fiber of the LArr bundle, which
transmission is just a 30% of the average).
We have recently created a CCD master flat, using long exposures of scattered
light. The flat reflect the pixel-to-pixel variation on the CCD and the defect
of the CCD itself. For most of the field it range between +-1% of the
average. To appreciate the effect of this correction click here. The Master CCD flat can be downloaded here (NOTE: it is only valid for the 2x2 binning mode).
- Tracing Mask In order to perform an accurate spectra
extraction it is required to know where the spectra lies in the CCDs.
For that it is required to illuminate with a continuum source all the
fibers, whatever its spectrum, with enough flux (~500 counts/pixel) at
any wavelength. PMAS is a Cassegrain instrument that suffer from
strong fleaxures that can move the tracing pattern several pixels
through the CCD, and distort it. Therefore, it is
highly recomended to take a tracing exposure every change of target,
and repeat it every 1-1.5 hours.
- ARC lamps In order to perform a good wavelength calibration it
is needed to find the dispersion solution for each spectra
independently. For doing so it is required to illuminate all the
science fibers with an ARC lamp.
Instrument Focus
** This operation should be done by CAHA staff **
PMAS focus consists of two different focus, the camera focus (CAMPOS at dm2k)
and the colimator focus (COLPOS at dm2k). Both focus are highly degenerated,
and therefore it is easy to find a combination of both that optimize the
instrument focus.
To focus the instrument you need to follow the instruction at the FSPEC
series focus option on the Focus menu at the main menu of the
PICS GUI:
- Obtain an exposure using an ARC lamp with emission lines at your
wavenlegth range. This will be your test exposure
- Select a window from this exposure. For doing so select the select
window from test exp. in the FSPEC menu. This will open a pop-up
window display a zoom area of your test exposure. You should change to
Coords the selection option (by defult is colors). Select an
area centered in an emission line spot by clicking the left-mouse
button. Confirm it with the right-mouse button. This will close the window.
- Start focus series on the FSPEC menu. It will ask you for the
optimal values and the range of values to move both the colimator and camera
focus. They depend on the temperature on the instrument, so you should start
from the previous values or the default values.
- Once finished select an spot in your sequence images by selecting this
option in the FSPEC menu. Again a pop-up window will open showing your
images. Select again the Coords option, and click over a bright and
isolated spot.
- After selecting an spot, analyze it by selecting this option in the
FSPEC menu.
- Once obtained the best focuses, you need to set them by selecting
set CALFOC and set CALFOC on the Focus menu.
Telescope Focus
Telescope focusing should be done every evening at the twilight, following the
next steps:
- In the PICS AG GUI mennu, set the window size (setWindow) to 100x100.
- Center an Star in the window field by clickling pointing Cursor...
in the SetWindow menu.
- Select Telescopes Series in the Focus menu of the PICS AG
GUI. A prompt will request you the best focus guess, the offset to apply
and the number of focus series to take.
- After running the series, a table will show you the FWHM at different
telescope focus. Select the best and set it using the telescope
Settings button.** This operation should be done by CAHA staff **
Observing in the Lens Array mode
A typical LArr observation consist of:
- Moving the telescope to the target:The best way to move the telescope to the target is to do it from the the telescope control system, and not from PMAS itself.
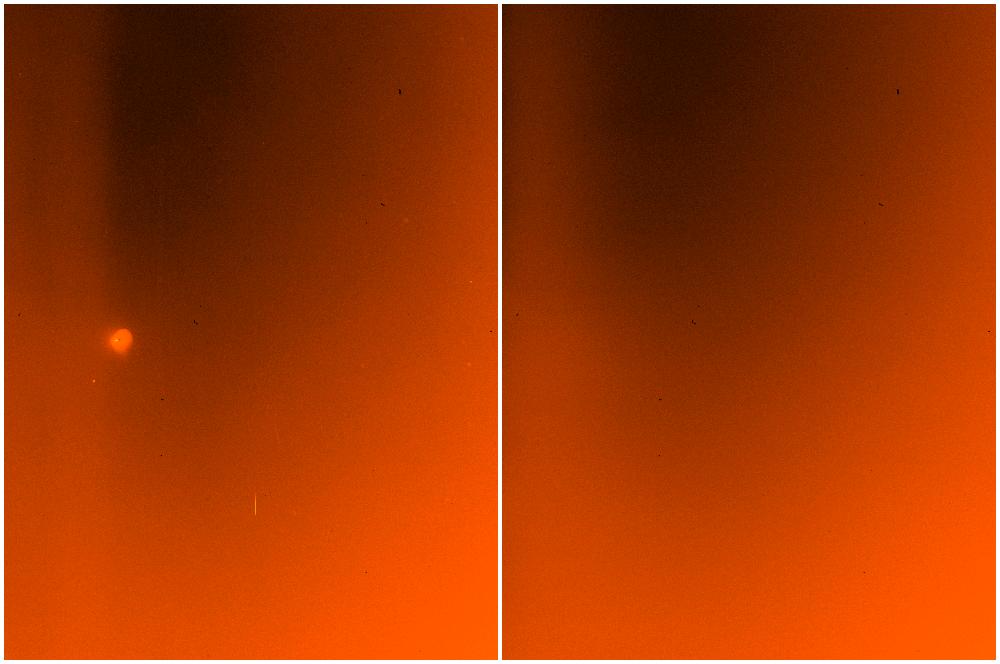
- Target Acquisition:On the PMAS A&G GUI select a
certain Exposure Time at the main menu. Once selected, press
the Acquisition button (bottom-left at the GUI). Check in the
A&G controler semafor GUI (ag.tcl) the shutter opens (turns
green), and the exposire starts. Wait until the exposure is
finished. If you need it, change the contrast at the Option
menu. A cut level of median+-5 + 1*sky uses to work
fine.
- Centering the target on the Lens Array: In the Pointing
Menu of the PMAS A&G GUI select Center Target on
LArr. Click with the left mouse button at the position you want
to send to the lens array, confirming with the right mouse button
** The selected position is where you click
with the Right mouse button**. A pop-up will appear asking for
confirming the offset to be applied in the telescope. Confirm
it!
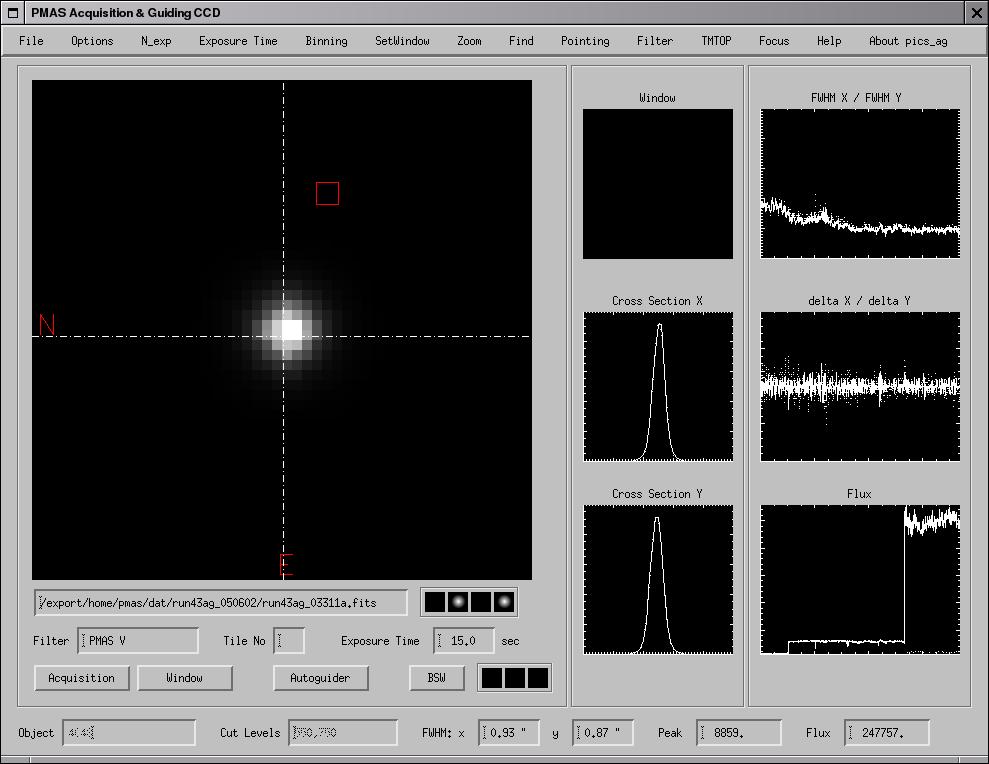
- Selecting a guiding star: Once the telescope has
performed the offset (when it gives you back the prompt in the IDL
session), you need to perform an acquisition (read above) in the
Guiding Field. A typical exposure of 15s should be enough (**The minimal exposure time for guiding is
15s**). For selecting a guiding star select the Select
Guide Star option on the Pointing menu of the PMAS A&G
GUI. Click on the desired guide-start with the left mouse button,
and confirm it with the right mouse button. Wait until a red square
of 50x50 pixels is plotted around the star. After that take a window
esposure by clicking in the Window button. Whenever you see
the star in the center of the field click the Autoguider
button. A pop-up window will appear to confirm your decision.
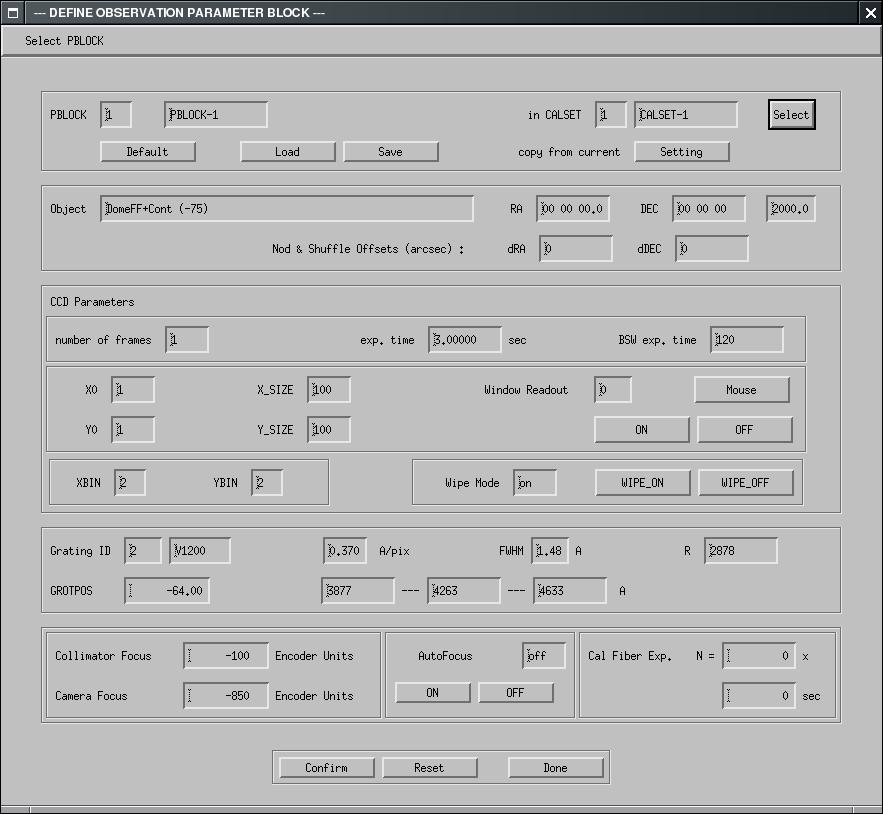
- Defining your spectral exposure: In the PICS GUI
main menu click on the DefExp. A new window will appear with
the different options that define an observation. If you are
interested in a simple exposure, just forget about most of the
options and focus on the Object name and the exp. time
entries. Once defined you can just Confirm the block and click
on Done. After that, you have to click in the START
button at the PICS GUI main window. If your exposure is a calibration
one you should click the especific start buttons for that
calibrations.
- Lamp Exposures: Arc and continuum lamps can illuminate the
lensarray by putting in the PMAS calibration unit. This is done by
selecting the Calibration mode in the SetMode menu of
the PICS GUI. *** This should be never done in
the PPAK mode***. This operation involves the moving of the AG
camera out of the beam, and the putting in of the calibration unit,
which requires about 2 minutes. Everytime you move to a new position
you should take a continuum and an arc calibration (most used is HgNe
one). After 1.5hours on targets you should recalibrate. *** Take into account these overheads when you compute
your requested time (~20%)***. After calibrating you should
select the observing mode.
** Be sure that the relative offsets GUI of the
telescope is in the X/Y mode **
Observing in the LArr Nod&Shuffle mode
The Nod&Shuffle is a mode where the charge is shifted by a number of
pixels in-between the position of the science spectra in the CCD while
the telescope performs an offset to a nearby sky-position, takes an
exposure of this sky, and moves back in position (and charge) to the
origin. With this method the sky is observed almost simultaneously to
the target, through the same lens/fiber an detected by the same pixel
in the CCD. By performing a subtraction at the level of the CCD a
highly accurate sky subtraction is achived. However, this method
implies to double the exposure time, since it requires to expose the
same amount of time on-sky than on-target.
To activate the Nod&Suffle mode should should click on the BSW
ON/OFF button at the main PICS GUI window and the BSW
button in the PICS AG GUI (to allow the guidding system to understand
that it has to perform coordinated offsets). A flag will be set on in
the BSW label. Once selected, you need to define the exposure
time of each individual pointing of the sequence in the DefExp
window, in the BSW exp.time entry, and the offset to be
performed in the Nod & Suffle Offsets entries for RA
(dRA) and DEC (DEC).
Observing in the PPAK mode
A typical PPAK observation consist of:
- Moving the telescope to the target:The best way to move the
telescope to the target is to do it from the the telescope control system,
and not from PMAS itself.
- Target Acquisition:On the PMAS A&G GUI select a
certain Exposure Time at the main menu. Once selected, press
the Acquisition button (bottom-left at the GUI). Check in the
A&G controler semafor GUI (ag.tcl) the shutter opens (turns
green), and the exposire starts. Wait until the exposure is
finished. If you need it, change the contrast at the Option
menu. A cut level of median+-5 + 1*sky uses to work
fine.
- Centering the target on the PPAK bundle: In the Pointing
Menu of the PMAS A&G GUI select Center Target on
PPAK. Click with the left mouse button at the position you want
to send to the lens array, confirming with the right mouse button
** The selected position is where you click
with the Right mouse button**. A pop-up will appear asking for
confirming the offset to be applied in the telescope. Confirm
it!
- Selecting a guiding star: Once the telescope has
performed the offset (when it gives you back the prompt in the IDL
session), you need to perform an acquisition (read above) in the
Guiding Field. A typical exposure of 15s should be enough (**The minimal exposure time for guiding is
15s**). For selecting a guiding star select the Select
Guide Star option on the Pointing menu of the PMAS A&G
GUI. Click on the desired guide-start with the left mouse button,
and confirm it with the right mouse button. Wait until a red square
of 50x50 pixels is plotted around the star. After that take a window
esposure by clicking in the Window button. Whenever you see
the star in the center of the field click the Autoguider
button. A pop-up window will appear to confirm your decision.
- Defining your spectral exposure: In the PICS GUI
main menu click on the DefExp. A new window will appear with
the different options that define an observation. If you are
interested in a simple exposure, just forget about most of the
options and focus on the Object name and the exp. time
entries. Once defined you can just Confirm the block and click
on Done. After that, you have to click in the START
button at the PICS GUI main window. If your exposure is a calibration
one you should click the especific start buttons for that
calibrations.
- Lamp Exposures: PPAK calibration unit, contrary to the
LArr, does not illuminate the whole fiber bundle with especific lamps
(read above). This unit just illuminate 15 fibers distributed in
between the science fiber in the pseudo-slit. Due to that you require
to illuminate the science fibers with an external illumination source
for (a) trace the spectra in the CCD (read calibrations for IFUs,
above) and (b) find a independent wavelength solution of each
spectrum. We have recently created a new calibration unit for the Science and
Sky fibers, consisting of two arc-lamps and a continuum lamp. The procedure to
calibrate is the following now:
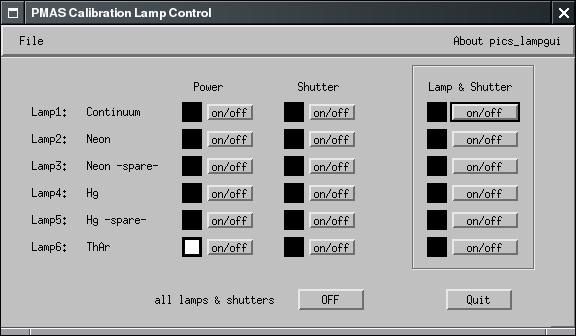
- Switch on the external calibration unit continuum lamp and
the continuum lamp in the PMAS Lamp GUI (see figures below), to take
a tracing exposure everytime you move to a new target and after
1.5houres following a target. It is also recomended to do if your
target transist the meridian
- For the wavelength you need to take ARC calibrations with the external
lamps (e.g., HeCs), by switching on the two (or one) of the lamps of the new
unit (ask the observer). Switch a lamp in the PMAS internal calibration unit,
so you have spectra (maybe a different one) in the calibration fibers too.
Take an exposure to calibrate every 1.5 hours (e.g., before and after each
continuum exposure). For doing so it
is required to install the desired Dome Arc lamp in the new external
calibration unit at the dome (please consult the list below) ** please
inform the CAHA staff about your especific wavelength and desired
Dome Arc Lamp with time**. External Arc lamps exposures will only
illuminate the science and sky fibers.
- If you want to use ThAr together with your ARC calibration for the
calibration fibers, you should have switched on the
ThAr lamp in the Lamp GUI. ThAr would saturate in a few seconds even
using the highest dispersion gratings. In order to avoid saturations
of the ThAr exposures you can open and close the ThAr shutter
independently of the science fibers shutter. In the DefExp GUI
you can select the number of times that you want to open the ThAr
shutter and the amount of time to remain open along your exposure
(right-bottom) (*** This only control the ThAr
shutter and not any other lamp shutter***). Due to cross-talk with
adjacent fibers we strongly recomend not to use the ThAr lamps simultaneously
to the science exposure. *** This is extremelly important *** Please advice of your setup to CAHA staff to test which exposure times are required with the ThAr lamps not to saturate.
- Dithering: PPAK fibers do not cover all the field-of-view. Ie.,
there are spaces inbetween fibers. In order to cover all the field-of-view it
is required to perform a dithering pattern. The minimun dithering pattern to
cover all the field of view consist of 3 pointings, following the pattern
(+-1.56,+-0.78). To do so you have to move the telescope while guiding, with
the PMAS AG GUI option Telescope + AG offset (relative).
The sequence is the following:
- Center the target on PPAK, and star guiding.
- Take the 1st exposure at the pointing (0,0)
- Once finished, move the telescope as described above by Delta_RA=+1.56, Delta_DEC=+0.78
- Take the 2nd exposure at the pointing (+1.56,+0.78)
- Once finished, move the telescope as described above by Delta_RA=0.0, Delta_DEC=-1.56
- Take the 3rd exposure at the pointing (+1.56,-0.78)
** Be sure that the relative offsets GUI of the
telescope is in the X/Y mode **
Calibration Lamps:
PMAS calibration unit (in both the LArr and the PPAK modes) consist
of 6 calibration lamps. The standard configuration comprises the following
lamps:
- 1 HL, continuum lamp.
- 2 Ne, Neon Lamp
- 3 Ne, spare Neon Lamp.
- 4 Hg, Mercury Lamp
- 5 Hg, Mercury Lamp
- 6 ThAr, "nominally" ThAr lamp (*)
(*) The ThAr lamp is heavely contaminated with an unkown Atomic element.
In the LArr mode the calibration lamps can illuminate all the
fibers (i.e., the lens array), by selection the Calibration
mode in the pics GUI. In the PPAK mode only 15-fibers,
which spectra are located in-between the science ones, can be
illuminated. For that you do not require to change the observing mode.
*** warning, with PPAK the mode should be always "Observing".
Line identification for the different PMAS internal lamps
Line identification for the different PPAK Dome Arc lamps
*** warning, Only one single PPAK dome arc lamp can be mounted at the same time. Please check your prefered one for your setup..
Quick on-line data reduction:
We have created a quick & dirty on-line data reduction
based on R3D and E3D to
allow the user to visualize the observed object.
To use it, we created an account with the user r3duser in the
r3dpipe computer. So you need to connect to this computer, and transfer
your data from rike to it.
ssh -X r3duser@r3dpipe
(ask the password to the CAHA staff)
Change to the directory:
cd /disk-a/r3duser
create there the working directory:
mkdir run68_060821
cd run68_060821
and copy from rike your data there (with scp).
The script requires at minimun the raw data to reduce, a continuum exposure
and an arc exposure. In addition a bias frame would be prefered. Once you have
your data in the correct directory, you just need to run the script:
R3D_pmas.pl
and follow the instructions.
NOTE: For the new E2V CCD (since October 2009), that
produce 4 fits files instead of one, it is required to "glue" this files prior
to run the precent script, by using the command "glue_new_pmas.pl", and using
the prefix of the fits files (ie., until the letter indicating the
sub-quadrant: a,b,c,d), to create a single fits file.
The script will ask you for the name of your
raw data frame, your bias frame (if any), your continuum frame and your
arc-lamp frame. It will subtract the bias, look for the location of the
spectra in the CCD and trace that location along the dispersion axis, extract
the spectrum. It performs a quick distorsion correction and wavelength
calibration (we will improve this part if required by the users), but good
enough to have an impression of the obtained data. For doing so it is required
to indicate the expected location of an emission line and the width of the
window to look for it along the cross-dispersion axis. It will also ask you
for the starting wavelength (CRVAL) and the wavelength step per pixel (CDELT).
It will automatically open
E3D and load the reduced data, to allow the user to inspect them.
An example of its use would be:
-----------------------------------
@ S.F.Sanchez, August 2006, CAHA
-----------------------------------
This program is thought to perform a quick
reduction of PMAS data to help you on visualizing the
results using R3D. It is not thought to produce final
products, and we strongly recomend to use it at the
telescope for a visual inspection of the data
-----------------------------------
Are you using PPAK(0) or the LArr(1) mode?
1
N.FIBERS=256
Input RAW frame to be reduced?
run61_01001b.fits
BIAS frame [ENTER for no bias subtraction]?
run61_00955b.fits
rm junk.fits
imarith run61_01001b.fits - run61_00955b.fits junk.fits
CONTINUUM frame to find & trace the spectra?
run61_01005b.fits
rm tjunk.fits
imarith run61_01005b.fits - run61_00955b.fits tjunk.fits
peak_find tjunk.fits 0 1 1 5 1 3 0.05 tjunk.peaks
Reading file infile 'tjunk.fits'Looking for peaks with in nsearch pixels...
DONE
NPEAKS=256
Writting the peaks file: tjunk.peaks
********************
ARC-LAMP frame to correct for distorsion & dispersion?
 [ENTER if not correction required]
run61_01004b.fits


cp junk.ms.fits run61_01001b.disp_cor.fits
write_img_header.pl run61_01001b.disp_cor.fits CRPIX1 1
CRVAL?
4500
write_img_header.pl run61_01001b.disp_cor.fits CRVAL1 3500
1
CDELT?
write_img_header.pl run61_01001b.disp_cor.fits CDELT1 1
tk_e3d.tcl &
Program: tk_e3d  Version 0.0-1.2
Press Enter to continue
Figures
Frequently Asked Questions
Spatial Modes: (1) Nod & Shuffle
The Nod & Shuffle is a operational mode implemented in PMAS (Larr
only!) to obtain an accurate sky by observing it throught the same pixels in
the CCD than the object. It consists on a consecutive exposure on the target
and the sky at the same frame shifting the charge in the CCD up and down to
record both at the same pixel. With this method the sky subtraction is the
best that it is possible to achieve. However the sky and object exposure needs
to be of the same exposure time, and therefore the overhead are
considerable. Evenmore due to the charge shift and telescope movement required
to offset between the object and the target. It is needed to
remind here that the continous movement of the telescope due to the Nod
operation and the guiding may conflict and the observation maybe lost. In this
sense this mode is unstable and a continous following of the observing process
is required in order to correct for this errors. Therefore, we strongly
recomend this mode to be observed in the observing mode, rather and in
service. We only recomend it when it is extractly necesary for the
science case.
The Nod & Shuffle mode requires a certain setup to be
activated. The Nod & Shuffle mode is designed as BSW in the
PMAS GUIs. Please take them into account:
- In the PBLOCK definition it is required to deffine the offsets to
be performed between the object and the sky, in the Nod & Shuffle Offsets
(arcsec): dRA and dDEC entries. Please take into account that the system
will try to guide only on the object, therefore do not introduce huge offsets
that introduce errors in the telescope tracking.
- There are two different exposure times to fill in the PBLOCK, one
is the total exposure time of the sequence, including all the single exposures
on target and sky. That should be written, as usual in the
exp. Time. An additional entry defines the exposure time of the
individual shots on target or sky, that is the BSW exp. Time. Since
both exposures are equal, it is required just one number. This latter exposure
time cannot be larger than 100s, in order to avoid strong sky variations. It
cannot be either smaller than the guiding exposure time. Of course it cannot
be larger and half of the total exposure time!.
- To switch on and off the Nod & Shuffle mode it is required
to click on two buttons, one at the PICS GUI, the BSW ON/OFF,
and another at the PICS AG, the BSW. Once switched on there must
be a white botton on in the BSW display at the bottom-right of both
GUIs. Important: (1) Remember to switch on the BSW mode before
to switch on the autoguider and (2) to grab the information at the PBLOCK it
is needed to switch off and on again the BSW mode.
- After that just operate PMAS as usual. However you need to track the
observation continously, since the system is unstable in this mode. Sometimes
there are conflicts between the offsets indicated by the Guider and the Nod &
Shuffle mode. If the instrument does not send the telescope correctly to the
sky or back to the target it is needed to perform this offset by hand or the
exposure will be lost. In order to avoid this lose it is needed to introduce
the offsets also in the DiffPoss GUI of the telescope control system.
That forces the observer to pay attention to the observation
process at each jump between the target and the sky, ie., less than 2
minutes.
Definitions
- PMAS Potsdam MultiAperture Spectrophotometer
- LArr PMAS Lens Array Mode
- PPAK PMAS Pak: 72" size fiber Bundle
- PICS PMAS Instrumentation Control Software
- PICS GUI The main GUI of PICS
- AG GUI The Acquisition and Guiding Camera GUI
- IFU Integral Field Units
- IFS Integral Field Spectroscopy
S.F.Sanchez et al.
|