General
Note: Preparation of the masks is the responsibility of the user, especially the
astrometry of the objects of interest. Since we have developed quite a fast and easy procedure for
the critical alignment of mask and telescope, we strongly recommend
that users make use of our experience. To help all observers
we offer to make the masks in our mechanical shop. Note, however, that
the observer is responsible for his/her masks.
To align mask and sky we use relatively bright stars (called reference stars hereafter) the positions
of which can be measured precisely even on short exposures. To this end the
masks contain holes (10 arcsec diameter) at the positions of the
reference stars. The positions of these reference stars measured on short
exposures are used to correct Cassegrain flange angle and
telescope position to improve the alignment of mask and sky. Two reference
stars are generally sufficient, but the prgs allow use of more reference
stars; more than 3 are not required. Alignment of sky and telescope is done with
2 reference stars only; so at least on the telescope you have to decide
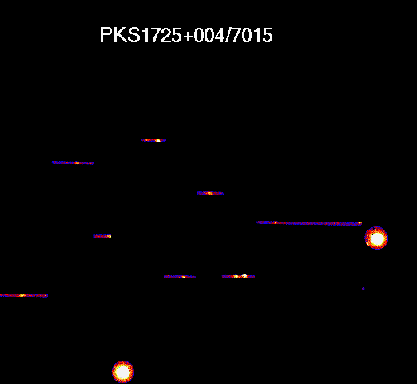
which ones to use. An image of the sky taken through a mask is shown here.
Since the positions of 10 arcsec diameter holes can not be precisely
measured on images, we put reference holes with 2 arcsec diameter at
known offset from the large holes in the mask. The positions of these
reference holes can be measured precisely on exposures of the sky.
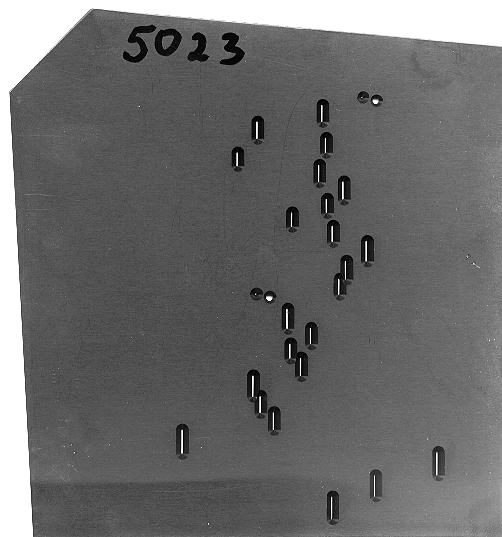
An example for a mask is given here showing the mask from below
(i.e. the upper surface is the focal plane). One can see easily the slits, the
large holes and the small holes. Orientation of the mask
in the instrument is unique.
To make a mask the astronomer has to determine
- the positions (RA, DEC) of the objects of interest to < 0.3 arcsec
accuracy (good astrometry is essential!)
- the positions (RA, DEC) of 2 or 3 bright stars in the field which are
used to align mask and sky. These stars should be bright enough to be
well visible on a 10 sec exposure but not too bright; a good range is V=17-19.
- RA, DEC for the desired center of the field
Note that all these coordinates must refer to the same equinox! RA
and DEC must be given in decimal degrees.
The procedures which are used in the following are in MIDAS. You can download a tarball with sample files and a
semi-automatically running example( to start it: @@ example)
To compute the positions of the slits and reference stars on the mask the
program @@ compmask has to be used. This program projects the celestial
coordinates of the objects onto a plane centered on the given center of the
field, and maximizes the lenghts of the slits. Compmask wants
to read a table with the columns :ad,:dd,:type.ad and dd are RA and DEC in
decimal degrees, and type is used to distinguish between
reference stars and objects: type=0 for objects, type=1 for ref.stars.
There are generally two situations: (1) the astrometry of objects and 2
reference stars is known from some source (2) the astrometry has to be
determined from an own exposure, eg. an image taken with MOSCA.
The astrometric data are known:
Check that there is no offset between different astrometrical sources if your input data come from
more than 1 source!
If your astrometry is an ASCII file, then the required table can be easily created with the command
crea/tab. Example:
crea/tab ngc6240 3 100 ngc6240.asc
This will create a table ngc6240 from the ASCII data file ngc6240.asc. Name the
columns with RA and DEC (must be in decimal degrees) properly, eg. if RA and
DEC are in columns 1 and 2:
name/col ngc6240 #1 :ad R12.7
name/col ngc6240 #2 :dd S12.6
The formats R12.7 and S12.6 display the RA and DEC values in HH:MM:SS and DD:MM:SS
(although they are given as degrees). Using eg.F16.8 instead of R12.7 or S12.6
would display the values in desimal degrees. Additional columns are allowed and
are simply copied.
Then create an additional column
crea/col ngc6240 :type I1
To set the new column type to the proper value: write/tab ngc6240 :type 0 all
sets all entries of type to 0, set type in the proper rows with the data
for the 2 reference stars to 1 with
write/tab ngc6240 :type 1 @row
where row is the row number.
The astrometric data are unknown
If the coordinates of objects and reference stars are not known, e.g. if one
has an astrometrically uncalibrated CCD frame, one has to
proceed in three steps:
- determine the astrometric positions of 10 or so astrometric standard stars on the CCD frame
- determine the 'plate solution' for the CCD image with these stars
- apply this 'plate solution' to calculate the astrometric positions of the
objects of interest
You could proceed as follows:
- use eg. skycat to get coordinates of >10 objects which you want to use as
astrometric standards. Make a MIDAS table with at least 3 columns :PPM,:ad,:dd
as described above. You can also use @@ std to measure the positions of the
standards on DSS images and create a proper outputtable
- 3. load the CCD image into the display: loa/ima CCD
- 4. use @@ obj to measure the same standards on the
CCD frame in the same order! Input 2 when @@ obj asks for type
(2=standard). When you have entered the last object, click on it again and
enter 3 to finish @@ obj (this is important, because the astrometry looses 1
row (not my fault), so the last object has to be entered 2x).
- 5. Proceed in the same way to measure the positions of the objects for which you want
to get spectra (enter 0 for type) and the 2 reference stars (enter 1 for
type),and again enter 3 to finish @@ obj.
- 6. merge the tables. First make sure that there is no selection active: sel/tab
stand all and sel/tab obj all, then merge these 2 tables: merge/tab stand obj input
- 7. Enable the astrometry package set/context astromet
- 8. @@ astro stand input mask to compute and apply the astrometry and
supply output for further use. The astrometry works only if the astrometric
reference stars are in the same order in both tables (eg. output from std and obj)
The output of @@ astro contains all columns required.
Computing the masks
When you have prepared the tables as described you are ready to compute the masks.
The command compmask (or compmask2)
- checks that the columns of the input table and the reference star data exist
- projects the RA,DEC data onto a plane (generalized coordinates) relative
to the plate center
- rotates the coordinates to the position angle given
- computes the lengths of the slits. The slits end in the middle between
2 objects
- computes the positions of the 2 10 arcsec diameter holes for the
reference stars
- computes the positions of the reference holes of 2 arcsec diameter
- computes spectral range covered (approximately)
Example:
@@ compmask ngc6240 16,52,55.5 2,23,42 -90. green_500
will compute the slit positions from the input table ngc6240
using RA = 16h 52 min 5.5sec and DEC = 2 deg 23 min 42 sec as field center
and a position angle of -90 degrees. The spectral range covered by grism
green_500 is computed. The output is stored
in table ngc6240_mask. Note that @@ compmask help gives help information.
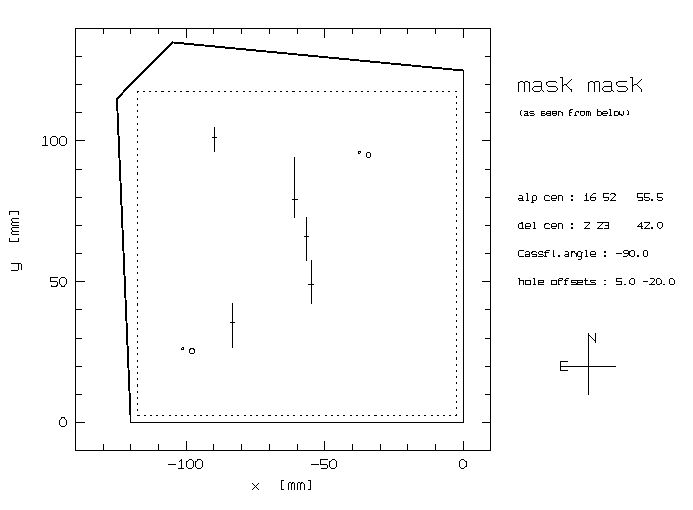
To plot the results use
@@ plotmask ngc6240
You should get a decent plot (click here for an
example) showing the whole mask with all slits and a dashed square indicating the
field of MOSCA. If not, you have probably created a highly rectangular graphics window;
try crea/grap 0 500,500
The position angle PA is defined in the standard way, i.e. 0 degrees, which is
normally used for direct imaging, gives direct images in the standard orientation.
Note that the slits are in EW direction if PA=0.
When you have computed and plotted a mask, check the slit lengths. They should not
be less than 10-20 arcsec because then the sky subtraction is difficult if not impossible.
Play with the position angle to get optimal slit lengths.
Compmask has been used many times and we know the slit centers
are calculated very accurately. The slit lengths are determined such that
the slits end in the middle between two objects. This may not always be optimal.
You can modify the slit lengths by writing into the table or editing it
(the relevant entries are :x_s and :x_e for the starting and end coordinates of the slit).
Note also that shifts of the field center in NS direction result in
wavelength shifts: a shift of the field center to S (if PA=0)
results in a shift of the spectra to the blue,
i.e. gives a better coverage of the red.
Note: negative DECs do not cause a problem; however if you have decs like -0 10 30.5
you must enter as field center -0,-10,-30.5. If your field center is -1 10 30.5 enter
-1,10,30.5.
 It is very important to take a good direct image of the
field with the reference stars clearly marked to the telescope!
It is very important to take a good direct image of the
field with the reference stars clearly marked to the telescope!
Getting the masks machined
Machining of the masks is done in the mechanical shop in Heidelberg. Create the
code for the CNC machine by the command @@ mechmask. Example:
@@ mechmask ngc0815 1234
Note that a 4 digit number - in the example 1234 -
has to be used as outputfile ! (This has to do with
the CNC machine program). Use a different one for each mask. The output of
mechmask is an ASCII file which outside users have to put on our ftp server
in the directory pub/fried/ . Send me an email (fried@mpia-hd.mpg.de) and
I will take care of the rest (outside users only!).
Allow at least 2 weeks for machining and transporting the masks to Calar Alto, and more
in case of holidays /vacation. It might be a good idea to check dates with me as soon as
you know the schedule of your observing run!
The slit width has to be specified and communicated to us; we use mostly 1.5 arcsec slits,
but 2 arcsec slits can be made as well.
Observing with masks
To observe with a mask
- put it into the aperture unit. There are 2 places for putting masks which
are accessible by removing the cover with yellow label
(mask1+2). A snap-in mechanism allows quick installation in a unique
orientation. The masks are accessible only if the aperture unit is in position "free". Eit the names of the masks in the GUI (setup)
- set the Cassegrain flange to the desired position angle
- move the telescope to the required center position of the mask
- enter @@ alimask. This command will
- 1. take an exposure of the mask with the build in lamp to measure the
positions of the reference holes
- 2. take a short exposure of the whole field to measure the 2 bright
stars and improve upon telescope position and Cass.flange angle
- 3. take 2 short exposures to measure the positions of the
stars in 2 large holes in the mask to compute flange angle and telescope position
corrections. This step can be iterated.
- take an exposure through the slits to verify that all objects are in their slits. This
step is optional. An example is this image
If things work well, this procedure will take 15 minutes. If you have
already used alimask (e.g. the night before and you know telescope
position and cass.flange angle) and want to continue, you can skip step 2
in the command @@ alimask which then reads the positions of the reference
holes from the aquisition exposure already taken and skips step 2 and thus
saves time. Note that it works only if telescope position and cass.flange
angle are already known well enough so that the 2 reference stars fall into
the 2 holes; so if you want to observe with the same mask several times
write down accurate position of the telescope and the file name of the
exposure taken during step 2
(something like AQ0037a.bdf, the program tells you the file name).
Do not forget to take flats and wavelength calibration exposures!
Up to now it is not possible to set the Cassegrain flange angle from the program.
Instead of changing it at the Cassegrain focus one can also change it from the
TECS computer by entering the command CASFL. Then enter the new position angle
and start to change it with CTRL A (CTRL Z = abort).
This operation is possible only if the telescope control is set to 'PULT'.
Use this only for small corrections of the position angle!
Downloads
tarball.

FPI
Settings on CS100:
Before turning on the CS100 check the settings:
    fine     coarse  quad.bal.
x    276       -1     404
y    862       -2     389
z    562       -2     378
With this z setting the Ne 6929.5 line should be near the maximum when the
electronics is turned on!
Turning on control electronics CS100:
If the FPI goes into overload when turning the CS 100 on, then
- turn off CS100, turn on again. Switch to BALANCE and then back to OPERATE.
- the cables are defect (or the connectors not porperly put into place).
WARNING: Do not disconnect cables when the CS100 is turned on!
- the QUADRATURE BALANCE knobs may be set wrong. Check the settings by
switching from OPERATE to BALANCE and from OFFSET to QUADRATURE ERROR. Adjust the
QUADRATURE BALANCE knobs until all needle readings are zero. Switch back to
OPERATE and readjust the QUADRATURE BALANCE knobs until all needle readings
are zero again.
Wavelength calibration :
The Ne 6929.5 line is used for the calibration in the 24th order.
@@ fpi will configure MOSCA like this:
- calibration unit in, Ne lamp on
- aperture unit: select slit, 10 arcsec width
- FPI in beam
- grism free, filter1 free
@@ fpi asks for the order sorting filter 685/20. If you have just started the
calibration procedure, wait at this point for 1 min until the lamp has warmed up and
then continue. @@ fpi performs a scan in z and analyses the result file
automatically. Enter -20,2,18 for z start, z step and # steps. If you are happy
with the result (FWHM about 14.0 units), store it when the routine asks you
to do so. Now you are ready to control the FPI using the GUI.
When the etalon is properly aligned the FWHM should not be larger than 14.5.
Otherwise the alignment has to be checked by doing several scans with X and Y
values variing independently by steps of about 50 units, thus finding the optimum
X/Y values (the variation will not only lead to a change of the resolution but
also to a small shift of zmax). If the FWHM of < 14.5 is not reached then contact
Hans Hippelein (or JWF, but only if you are very desperate!)
If the zmax value of the calibration is off from zero by more than 50 units,
check the z setting of the CS100 controller.
 Do not forget to turn off the Ne lamp when the calibration
is done!
Do not forget to turn off the Ne lamp when the calibration
is done!
Operation of the FPI
To set the FPI to a certain wavelength, enter it in the GUI. Note that it has
to be entered in nanometers. The program will then
give you a list of orders and corresponding resolutions. Clicking on one of
the orders will set the FPI to the desired wavelength and order.
The reset button in the GUI resets the CS100 control electronics and sets the
z value to zero, the x and y values will be as initialized. Use this button after
an overload has occurred.
MIDAS
The most useful standard MIDAS commands are (for more details use help command):
- load/image to load an image into the display. To load an image with cuts 100,200 and scale of 2 you may enter load ima cuts=100,200 sc=2 or shorter
@@ ld ima 100,200 2
- plot/col or plot/row to do plots
- center/gauss to determine the position of an object
- comp/ima z = a+b*3*c to do image arithmetic
The following special utilities are available:
  *** for installation ***
@@ install      to measure and save installation parameters
@@ fprisini     initialize focussing prism
@@ fpi          to calibrate the FPI
@@ rotcen       to measure rotation centre of cass flange

 *** for looking at the data ***
@@ autoload     load frame, determine cuts automatically
@@ backdet      load image with cuts near background
@@ zoom fac     zoom image by fac centered on marked  object

 *** simple but useful  ***
@@ seeing       measure seeing for many stars
@@ pa           measure position angle between two objects
@@ pixel        convert measured to physical pixels
@@ offset x,y   measure offset to a position x,y and move telecope
@@ aperoffset   offset slit in direction of dispersion

 *** take series of exposures ***
@@ autofocus    do a focus series (MOSCA or telescope)
@@ autoflat     do automatically flats
@@ expose       configure MOSCA, take series of exposures
@@ focus        evaluate focus series
@@ sequence     sequence of exposures, dither telescope

 *** correction of data ***
@@ fcor         flatfield correction
@@ spex         simple extraction of spectrum and skysubtraction

 *** working with masks ***
@@ alimask      to align mask and telescope
Detailed help information is given when entering help as first parameter
in a command, eg. @@ seeing help. A list of all available special commands is
obtained with @@ mosca
The following commands are short forms of MIDAS commands:
- cg : center/gauss
- cco : clear/chan over
- stc : stat/cursor
- rk keyname: read/key keyname
- wk keyname: write/key keyname
- rd read/desc
- ld ima cutlow,cuthigh scalefactor
show/comm gives you an overview of all user defined commands
Saving the data
To save the data on DAT in tar-format use
mt rew
tar cv *
Be careful not to overwrite data; it is best to use a new DAT for each save!
List the tape with
mt rew
tar tv > dat.list
To save the data as genuine FITS-files use the CA-script
fitscopy
and to list the DAT use
ccdlistd
You may also use these commands in easy to use GUI versions
(fitscopyx and ccdlstx). To activate these scripts enter the command
getastro caha
 Trouble shooting
The GUI does not start/work properly
- if Netscape is running on the same terminal, close it, restart the GUI and
then open Netscape again. Always start the MOSCA GUI before Netscape and CCD GUI! Note that
Netscape should be started like this: netscape -install &!
- quit the GUI, turn off the electronics of MOSCA, and restart the GUI (start_mosca)
- if nothing helps, logout completely and restart properly.
The receiver does not convert the files
This happens if the receiver is working on a wrong directory; this can not
happen if you start the software according with the macro start_mosca. If it happens by
some reason, either set the proper directory manually, or logout and restart.
Communication problems
The computer environment is not as stable as it should be; this causes sometimes
loss of communication to MOSCA or the CCD, so if you enter a command, it will not
be executed properly and MOSCA or the CCD is in a confused state. If this happens,
quit the GUIs of MOSCA and the CCD, turn off/on the electronics of MOSCA, reboot
the EPICS system, wait for 2 minutes and start MOSCA and CCD.
Up to now this has helped always. In tough cases, a reboot of the
workstation (ask the night assistents to do it, there is a special procedure
required!) may be necessary and helpful (the CA personnel will deny this, but
it is my experience that it may be necessary sometimes).
Computer environment
Many mosca prgs communicate with the CCD camera and MOSCA. This requires that
the UNIX variable path must contain the right entries and that some environment
variables must be set properly. This is done automatically in the
xterminal windows which open when selecting MOSCA in the instrument select GUI.
However it happened in the past that someone modified the environment which
caused some UNIX environment variables not to be set properly. As a
consequence of this the communication between MIDAS and MOSCA does not
exist and one gets error messages like
" MOSCA_DIR/.../mosca_filter1 script not found" or so.
If this happens, quit MIDAS and set the environment variables by entering
the command set_mosca. If this does not work use
source /disk-a/staff/MOSCA/scripts/.mosca
When you have to start via another computer, the following procedure
may be successful:
login the computer, eg. castor. Then enter the command
xhost +
connect to ultra1 via telnet, and then enter set_mosca
error message: final position not reached
If this does appear just repeat the command. It is caused by too small
tolerances in the control software and not a real problem.
The calibration unit does not work
This has happened a few times after installation, never during
the observing run. Take the module out and move the mirror in
the beam ( a few mm are sufficient) by hand by turning the motor
and start again. There was an electronical problem which has been fixed, and
up to now this problem has not occured again.
No sound
Some MOSCA MIDAS commands are producing sound output. If you do not get sound
then either the volume of the speaker may be turned off, or the speaker is
not activated. In this case, start the soundtool and select headphones as output.
The MOSCA team
- construction + mechanics: Bellemann, Benesch, Franke, Muench
- electronics: Salm, Grimm
- CCD: Marien
- software: Zimmermann, Bruege
- tests: von Kuhlmann
- PI: Fried
- responsible on Calar Alto: Aguirre, Thiele
send an email if you have questions to fried@mpia-hd.mpg.de
Appendix
Changing of modules and filters
MODULES AND FILTERS MUST BE CHANGED BY STAFF ONLY! ALWAYS
PUT THE TELESCOPE IN THE ZENITH POSITION TO CHANGE MODULES!
To change a module proceed like follows:
- quit the MOSCA GUI. This MUST be done first.
- move telecope to zenith
- turn off the electronics of MOSCA
- change the module
- turn on the electronics of MOSCA
- reboot the epics computer
- start_mosca, start_ccd
Changing the filter list
To change the filter list, enter the command
mosca_select_filters
in the xterm labelled instrument. A GUI will appear, which allows to click the filters from
the general Calar Alto list. Select the proper position in the corresponding wheel by clicking into it; the selected position will turn light blue. Then select the filter by scrolling in the list, and double click on the chosen filter. The values stored in the list will be taken over. If you want to set a position to free click onto the free button. Terminate by clicking the save+exit button and restart the MOSCA GUI.
Using own filters/installation of new filters
To find the focus offset for a new filter, install it in the desired wheel, enter its name in the filter list. Determine the focus without filter, then
with the new one as described, then enter the focus offset
(= focus with filter - focus without filter) in the filter list, restart the GUI and the focus offset will be automatically corrected for whenever you use this filter.
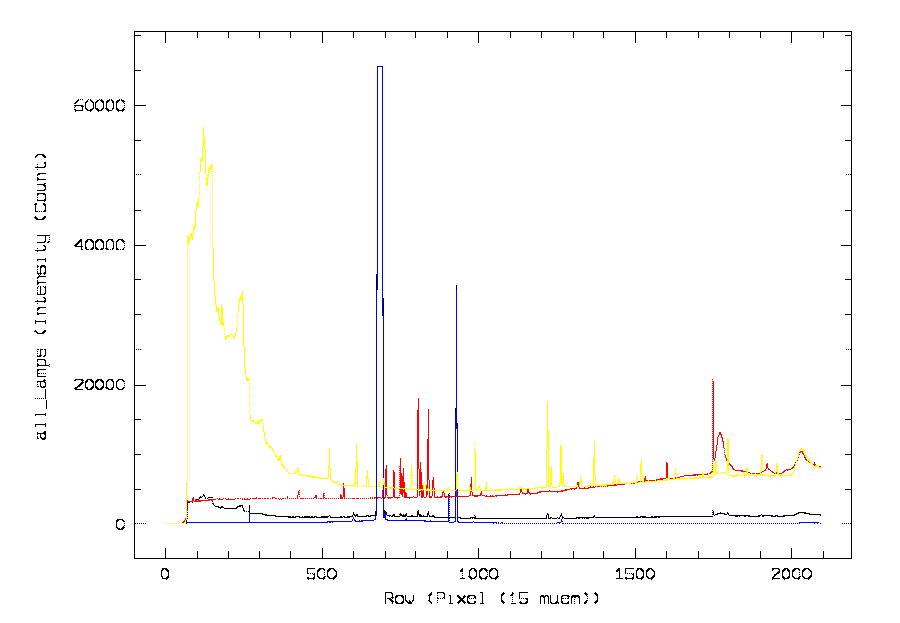
Calibration unit
4 lightsources are selectable :
- 1 tungsten lamp + BG38 filter as continuum source
- 1 Ne spectral lamp
- 1 Ar spectral lamp
- 1 Hg/Ar spectral lamp
Spectra and wavelengths of the lamps are here.
The light is deflected into the instrument by a plane mirror which is
automatically moved in/out of beam.
Aperture unit
5 apertures are selectable :
- 2 masks which can be easily exchanged even if the aperture unit is
installed. The standard configuration is:
- mask 1: pattern of holes, used for testing the distortion
- mask 2: black. Useable as additional shutter (e.g. when
storing the instrument)
- free. Used for direct imaging
- 1 longslit. Its width is adjustable from 0.3 to 15 arcsec.
The length of the slit can be limited with a decker and the center part
can be masked
- 1 hole with 200 micron diameter. Used for determining the internal focus.
Filters
The following filters are standard MOSCA filters; if one of these is
used, any focus offset due to chromatic effects in the optics of MOSCA or non-flatness of
the filters is automatically corrected for.
U-filter
glasses: UG1/1mm + BG 39/2mm
color: black , offset 46 in wheel 1
transmissioncurve: 
B-filter
glasses: BG 37/1mm + BG 39/2mm
color: blue , offset 50 in wheel 1
transmissioncurve: 
BV-filter
glasses: BG 39/3mm
color: turquoise , offset -15 in wheel 1
transmissioncurve: 
V-filter
glasses: BG 18/1mm + GG 495/2mm
color: green ,offset 0 in wheel 1
transmissioncurve: 
R-filter
glasses: OG 570/2mm + Calflex X
color: red , offset 150 in wheel 1
transmissioncurve: 
I-filter
glasses: RG 780/3mm
color: red , offset 40 in wheel 1
transmissioncurve: 
z-filter
glasses: RG 830/3mm
color: black , offset 63 in wheel 1
transmissioncurve: 
CADIS-filters:
=============


Name    Offset (wheel 2)
........................

398/10    -1735
455/110   -1679
522/16    -1779
529/30    -1787
586/32    -1685
612/18    -1585
628/15    -1653
685/20    -1628
703/22    -1663
817/24    -1705
916/32    -1666
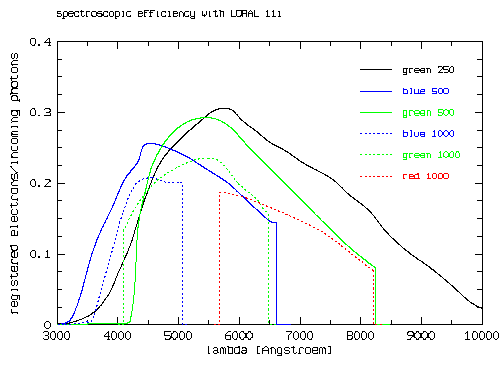
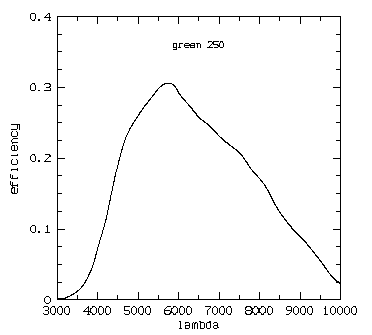
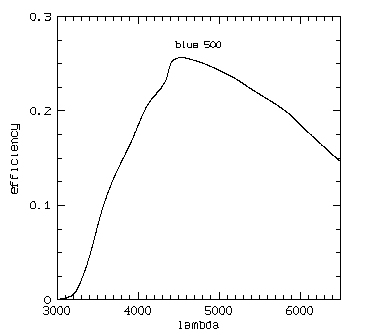
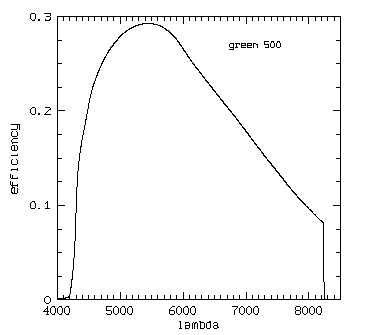
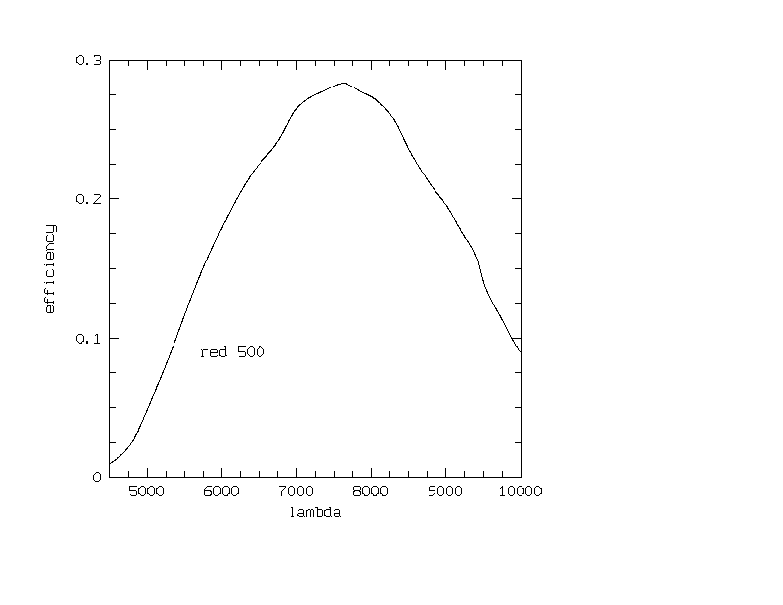
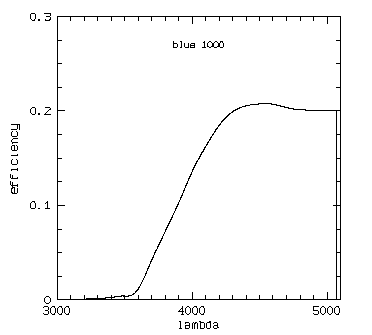
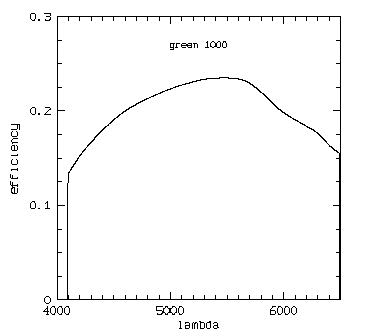
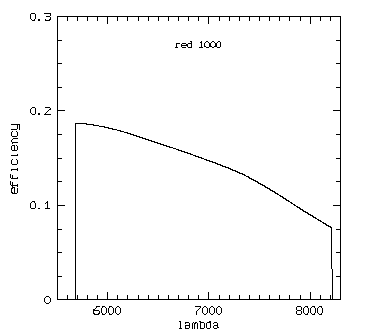
Grisms
There are 7 grisms available. Click onto the grism name to get the
efficiency curves. These curves give the quotient of incident photons to
registered electrons measured for a spectrophotometric
standard star under perfect conditions with the LORAL 11i CCD.
(The red part of the curve of the green250 grism may be contaminated by
2.order light; the true efficiency in the red part will be somewhat lower therefore)
The efficiency curve for the red500 grism has to be deteremined
Note that grism green250 has no order separation filter. If the region of
interest is in the red part of the spectrum, a GG400 or GG455 or GG495 filter
may be used in filterwheel I to block the blue light.
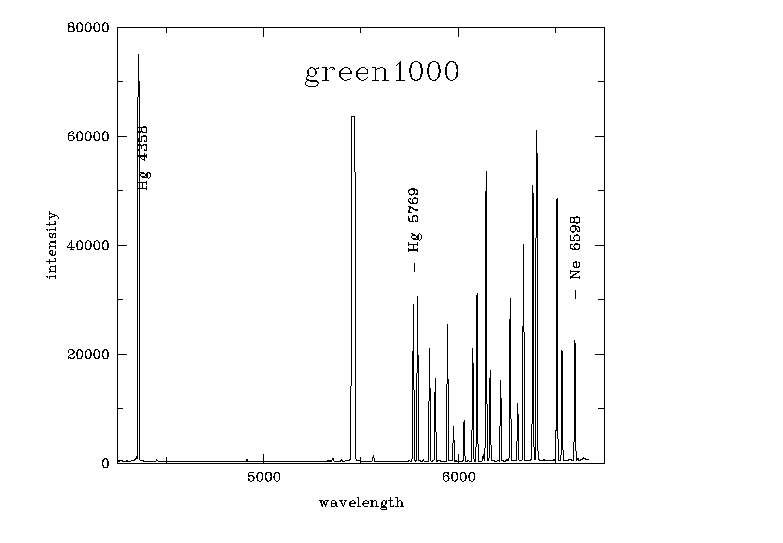
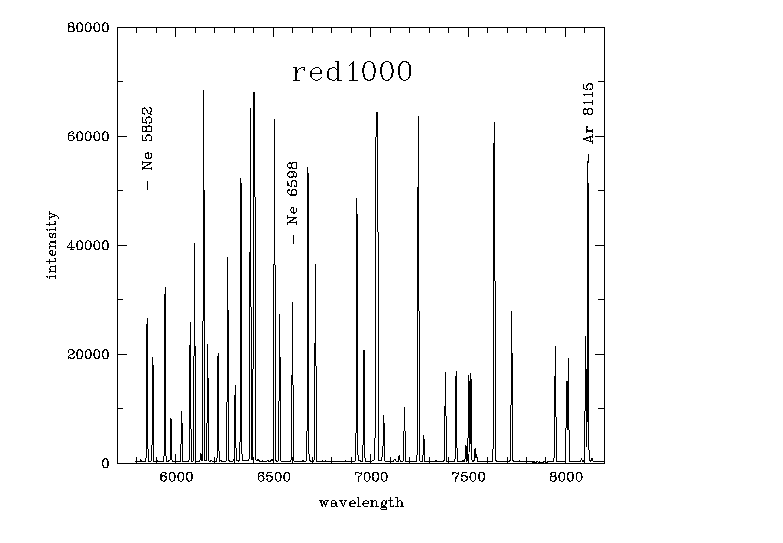
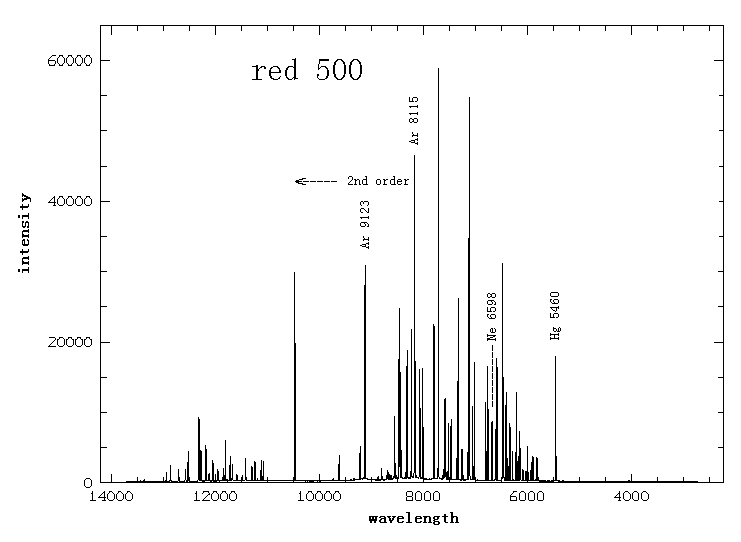
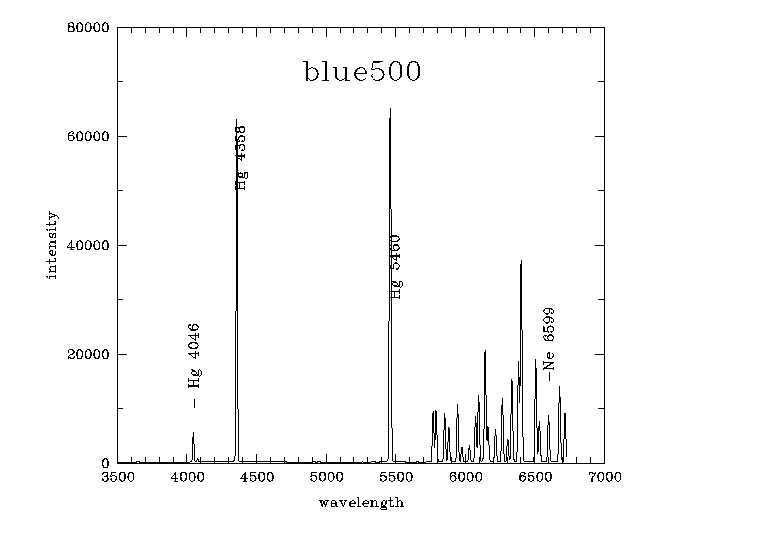
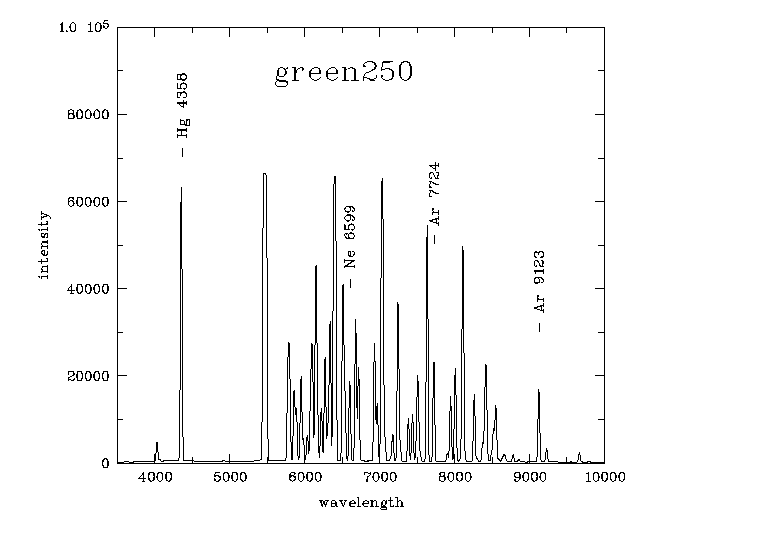
Wavelength calibration
Calibration sample spectra with some line ids marked:
sample spectrum blue 1000
sample spectrum green1000
sample spectrum red1000
sample spectrum red500
sample spectrum green500
sample spectrum blue500
sample spectrum green250
Spectral line catalog in MIDAS
table and
fits format. To copy one of these files
to your area click on the file and then use the save as button of netscape!
Image scales and distortion
Mean overall scale
The mean magnification factor of MOSCA is 0.2755 which gives an image scale
of 1/(0.1697*0.2755) = 21.3893 arcsec/mm or 0.3208 arcsec/pixel of
15 micro meters.
Exact scale
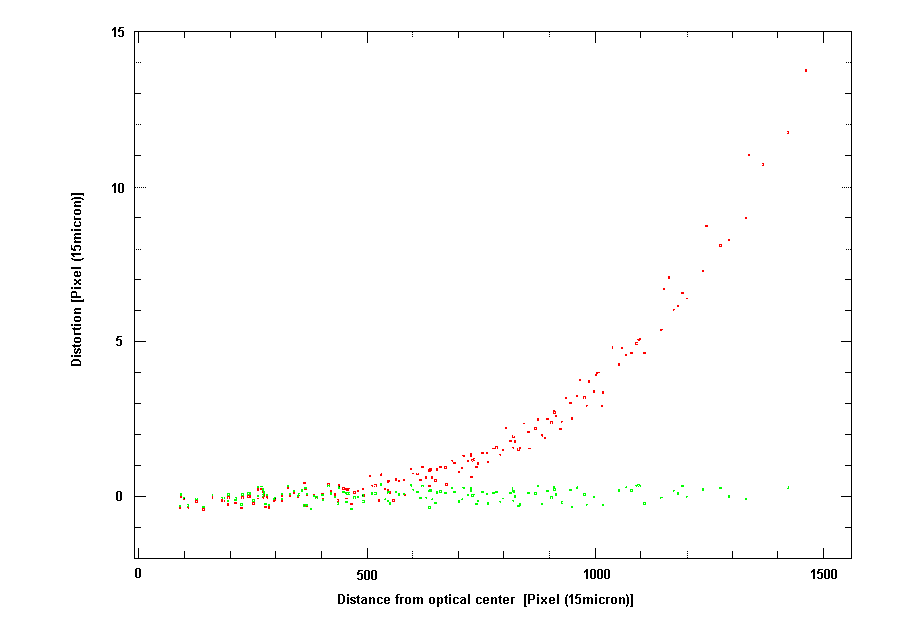
The mean magnification factor is a good approximation over a large part of the
field. The radial image distortion
is < 1 arcsec over large parts of the field and reaches a few arcsec in
the corners. The optical center is located 0.345mm E and 0.42 mm S of the position
of the hole on the CCD. The true distances (R,A) from the optical center
can be computed from the measured ones (r,a) by one of the following polynomials:
R = r + 8.0139*10**-4*r - 1.49886*10**-6*r**2 - 2.51185*10**-12*r**4   [pixel 15mue]

A = a + 8.0139*10**-4*a - 4.66498*10**-6*r**2 - 7.57288*10**-11*a**4   [arcsec]
After these corrections the magnification factor = 0.27507 (green dots in the
figure).
Flexure of MOSCA
The flexure of the instrument has been determined in February 1997 to be
1/7 arcsec (0.44 pixel) including reproducibility of the position of the
aperture unit.
Shutter uniformity
The shutter is of the sickel type. Nonuniformities as derived from flats are maximal
- 3% for 1 sec exposures
- 1.9% for 2 sec exposures
- 0.74% for 5 sec exposures
- 0.35% for 7.5 sec exposures
- 0.24% for 10 sec exposures
These values were determined in April 1998.
Filterwheel 1
- 10 positions
- filterdiameter 70 mm
At the position of this wheel, the beam has a diameter of 59 mm.
Position 1 must be free!
Used for the standard braod band filters. Since this wheel is in the parallel beam filters may cause reflections. The standard filters are inclined for this reason.
Filterwheel 2
- 10 positions
- filterdiameter 70 mm
At the position of this wheel, the beam has a diameter of xx mm.
Position 1 must be free!
Grismwheel
Position 1 must be free! The focussing prism has been taken out.
Focussing prism
The focussing prism allows you to find the focus quickly. The
principle is like a normal Hartmann test, where you take 2 images
of a point source in 2 half beams. In focus the 2 images
coincide. The focussing prism covers one half of the beam and deflects the
image of a point source by a few arcsec, so one obtains the 2
Hartmann images simultaneously. There is a linear relation between focus and
displacement.
Preparing the focussing prism
- determine the focus of MOSCA by a focus series
- select the tungsten lamp, the whole in the aperture unit,
the focussing prism in the grismwheel, no filter.
- take an exposure, measure the positions with MIDAS: @@ fprisini. Do
what the command tells you to do. The measured positions are stored
(table fprisini.tbl).
Using the focussing prism
Note: once initialized, the focussing prism can be used to focus both
MOSCA and the telescope!
- prepare the focussing prism as decribed above
- take an exposure of a star or of the whole in the aperture unit
- find the focus offset with the MIDAS command @@ fpris
Orientation, physical pixels
To get the files in standard orientation (N top, E left) the files are x-flipped
in the getfits procedure (for the LORAL 11 and the SITE16a CCD)
and for some good reasons the start is set to
2300-startold,1. Therefore the pixels you read off the frames
(e.g. with get/cursor) are not the true physical pixels of the CCD.
All MOSCA prgs work perfectly with these start values. However if
you want to set a window on the CCD the pixels must be converted
to the true physical ones which have to be entered in the CCD GUI:
xphysical = 2300-xmeasured
yphysical = ymeasured
The command @@ pixel converts the pixels for you, and it works
also on binned frames. We are working on this nuisance (the solution
is not as trivial as it looks).
Focussing unit
the focussing unit moves the camera optics. Maximum range is 2800 micro
meters. Large numbers mean that the camera is near the CCD. Rings
(0.1, 0.2, 0.3, 0.5mm or 1mm thick) can be placed between CCD and
the mounting flange to get into the focus range. The distance
between CCD and the dewar window must be 3-4 mm.
Changing the focus
The focus of MOSCA may be moved by the command
mosca_afocus value
where value is the desired focus value, e.g. mosca_afocus 8200. Note that value must be
in the range 6500-8900. This focus will be lost when a filter or grism is selected, since
upon this action MOSCA sets the focus corresponding to the focus zero point and offset for the
filter chosen.
Installation Notes
Mounting MOSCA to the telescope:
- set the position angle of the Cassegrain flange to 0
- the TV guider in standard orientation, the slit-viewing optics of
TWIN installed
- the handle of the carriage of MOSCA must point towards N
(the telecope pier). The calibration module points to N.
- TV-guider has to be set in spectroscopy mode (s), f/10
Astronomical orientation
To check the orientation of CCD on the sky, put the mask
labelled "orientation mask" in the aperture module, select the mask,
the continuum lamp (60 % intensity) and take a 5 sec exposure.
The image shows a star-like pattern, the shorter ray points roughly
towards NNE for 0 degree position angle of the Cassegrain flange.
The MIDAS frames are automatically flipped and/or rotated in the receiver
so the MIDAS images are always in standard orientation, but not the FITS images!
SITe 16a CCD (normally used)
- the label on the dewar point towards N, the mounting rails to S
- no distance rings
- internal focus near 8350 in white light
- the files must be flipped in x to get standard orientation
- the image scale is 0.3208 arcsec/pix
- the chip has little fringing
LORAL 11 i CCD
- the label N on the dewar points towards N, the mounting rails to S
- distance rings 1.7 mm
- internal focus near 8050 in white light
- the files must be flipped in x to get standard orientation
- the image scale is 0.3208 arcsec/pix
- the chip has strong fringing
SITE 18b12 24 micron pixel
- the label N on the dewar points towards N
- distance ring 2mm
- internal focus ?
- the files must be rotated ccw by 90 deg to get standard orientation
- the image scale is 0.5158 arcsec/pix
- this CCD has benn used only once up to now
EEV l2 15 micron pixel
- the label N on the dewar points towards N
- distance ring 4mm
- internal focus 8300
- the files must be flipped in x to get standard orientation
- the image scale is 0.3208 arcsec/pix
- the chip has strong fringing
Software adaptation to CCD
The directory /disk-a/staff/MOSCA/mosca_prg must contain all prgs which
are used by the software. Some of the prgs are chip-dependent: alimask autoflat detexp expose install fpi pixel
These are stored in directories
/disk-a/staff/MOSCA/mosca_prg_SITe16a
/disk-a/staff/MOSCA/mosca_prg_SITe18b12 and
/disk-a/staff/MOSCA/LORAL11i
and must be copied from there to mosca_prg or the local user directory. For the EEV chip the
SITE16a prgs should work (not tested).
(Files in mosca_prg_SITe18b12 have been supplied by HJ Roeser)


